Phaser Coding Tips 8
Phaser Coding Tips is a free weekly email – subscribe here.

Welcome!
In the last issue we covered how to make a bullet pool and various shoot-em-up weapon types. This time we’re exploring a way to create waveforms, or paths for your baddies to follow. Motion paths don’t apply to just shoot-em-ups of course. They’re useful for nearly all types of game, and as you’ll learn are quick to create.
Get the source
I’m only going to highlight the most important parts of the code here. So please always look at the source first. If you’ve questions about something I didn’t cover then ask on the forum.
Run / Edit the code on jsbin or codepen
Clone the phaser-coding-tips git repo.

WaveForms
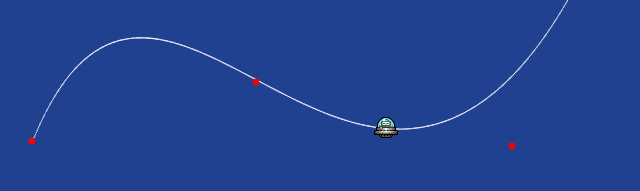
Hidden away within the Phaser.Math class are three rather innocuous methods: linearInterpolation, bezierInterpolation and catmullRomInterpolation. Unless you’ve ever had a specific need to investigate these they have probably sat there unloved, even though they’ve existed since the beginning of Phaser.
Yet use them in the right way and you can create paths just like this one:
Pretty neat huh?
So how can we get them to work for us?
Interpolation for the Nation
Each function works by taking two parameters: An array of values and a percentage between 0 and 1. The array should contain numeric values, for example:
[ 0, 128, 256, 384, 512, 640 ]
.. and that’s all it needs. It doesn’t matter how large the gaps are between the values, or if they are positive or negative, floats or integers.
The second parameter is a value between 0 and 1 which dictates how far along the ‘path’ the interpolation value will return. A value of 0 is the start, 1 is the end, 0.5 is the middle, etc. Here is a complete example of a call:
var points = [ 0, 128, 256, 384, 512, 640 ];
var distance = 0.5;
var result = this.math.linearInterpolation(points, distance);
In the above result will equal 320. Which is exactly half-way between 0 and 640 in a linear interpolation.
So the function works. But how do we take this and turn it into a motion path?
It’s to do with how many times you call it
If we call an interpolation function once, we get a single value out of it. By varying the percent parameter we can iterate through the path in as many steps as we need. In this example we will create a path going from the left to the right of the game, a total of 640 pixels, passing through 6 points. We will also use a BitmapData object to plot the path to.
var PhaserGame = function () {

this.bmd = null;

this.points = {
'x': [ 32, 128, 256, 384, 512, 608 ],
'y': [ 240, 240, 240, 240, 240, 240 ]
};

};

PhaserGame.prototype = {

create: function () {

this.stage.backgroundColor = '#204090';

this.bmd = this.add.bitmapData(this.game.width, this.game.height);
this.bmd.addToWorld();

var py = this.points.y;

for (var i = 0; i < py.length; i++)
{
py[i] = this.rnd.between(32, 432);
}

this.plot();

},

plot: function () {

this.bmd.clear();

var x = 1 / game.width;

for (var i = 0; i <= 1; i += x)
{
var px = this.math.linearInterpolation(this.points.x, i);
var py = this.math.linearInterpolation(this.points.y, i);

// var px = this.math.bezierInterpolation(this.points.x, i);
// var py = this.math.bezierInterpolation(this.points.y, i);

// var px = this.math.catmullRomInterpolation(this.points.x, i);
// var py = this.math.catmullRomInterpolation(this.points.y, i);

this.bmd.rect(px, py, 1, 1, 'rgba(255, 255, 255, 1)');
}

for (var p = 0; p < this.points.x.length; p++)
{
this.bmd.rect(this.points.x[p]-3, this.points.y[p]-3, 6, 6, 'rgba(255, 0, 0, 1)');
}

}

};

game.state.add('Game', PhaserGame, true);
You can copy and paste the above code into a file or jsbin to test it. All it does create a points object with two properties x and y. These are arrays. When the code starts it randomises the y array contents.
The resulting path is drawn to the BitmapData. We determine how many times to iterate through the path with the line: var x = 1 / game.width. For a 640 pixel wide game x will equal 0.0015625, so the for loop in the plot function will run 640 times.
We plot a single white rectangle to the BitmapData for each interpolation result. At the end we plot yellow rectangles to represent the points through which the path has moved.
You can see the two other forms of interpolation commented out in the plot function. Swap them around as needed to see the differences between the 3 types.
Linear, Bezier and Catmull Rom
By taking the above code and evolving it slightly we can randomise the path on start-up and step through the three different modes. You’ll find this example in the github repo and on jsbin. With just 6 points in our path look at the differences between the three:
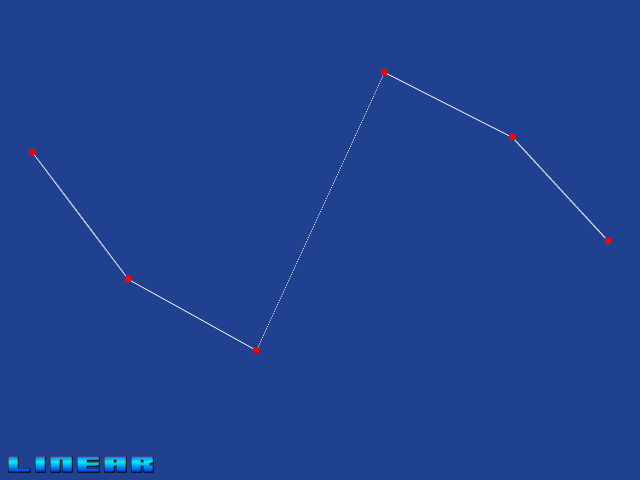
This is linear interpolation. As you expect it moves directly from one point to the next.
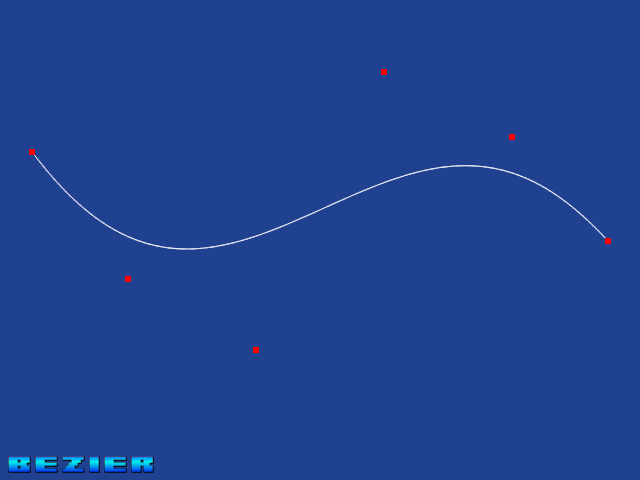
This is bezier interpolation. Here you’ll get a much smoother spline, with the additional points on the line acting as control nodes for the bezier curves. If you’re interested in the theory behind it there’s a great piece on Wikipedia.
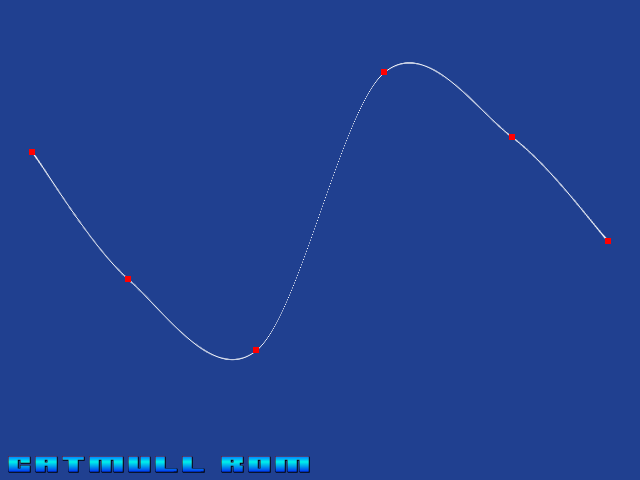
Finally we have Catmull-Rom interpolation. The main difference here, as can be seen in the screen shot, is that the points along the spline also make up the control points. As such you can see the path pass through each control point, giving a smooth interpolated result. Incidentally it’s named after Edwin Catmull and Raphael Rom and again has a fascinating history worth reading about.
Alien Splines
Splines can be used for all kinds of things. But in this example we’re going to use them as a motion path for some aliens. While we could take the plot function we have now and use it to update a sprite in real-time, that is also highly inefficient. Instead we’ll trade a tiny amount of memory for CPU time and copy the path data to an array. You can see this in the file aliens.html in the repo. In the plot function the point data is added to a path array:
this.path.push( { x: px, y: py });
and in the update method we have a single sprite following it:
this.alien.x = this.path[this.pi].x;
this.alien.y = this.path[this.pi].y;

this.pi++;

if (this.pi >= this.path.length)
{
this.pi = 0;
}
Of course this is about as basic as you can make it. You could vary the speed, you could reverse the path, you could release 20 sprites instead of 1, all following the same pre-calculated point data. The important part is that now you’ve got a way to make something follow the spline we created.
About Face
What if we want our sprite to face the direction it is travelling? We can accomplish this by adding an extra property to the object we add in the paths array: angle.
Within the plot method we calculate the angle between the current node and the one before it:
var node = { x: px, y: py, angle: 0 };

if (ix > 0)
{
node.angle = this.math.angleBetweenPoints(this.path[ix - 1], node);
}

this.path.push(node);

ix++;
and then in update we make the sprite use it:
this.arrow.rotation = this.path[this.pi].angle;
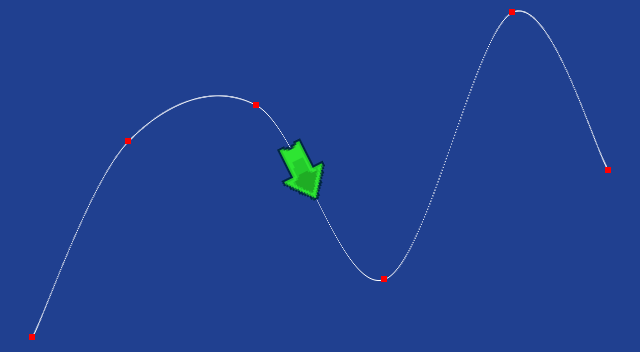
The result is our sprite perfectly following the spline as it traverses it.
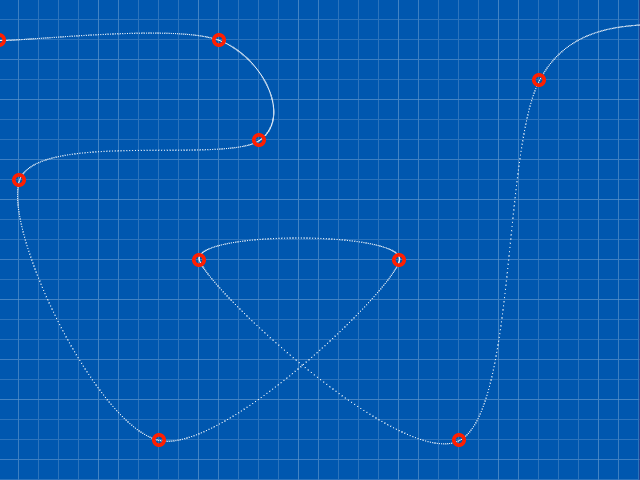
The WaveForms Path Editor
![]()
By now you can surely see the power of using splines in your games. Yet so far all we’ve done is create random paths using a fixed 6 points, varying on the y axis alone. What if you could edit the paths? Dragging each node around in real-time, adding and deleting nodes at will, until you’ve got the perfect path for your sprites?
Well I’m glad you asked – because that’s exactly what WaveForms is 🙂
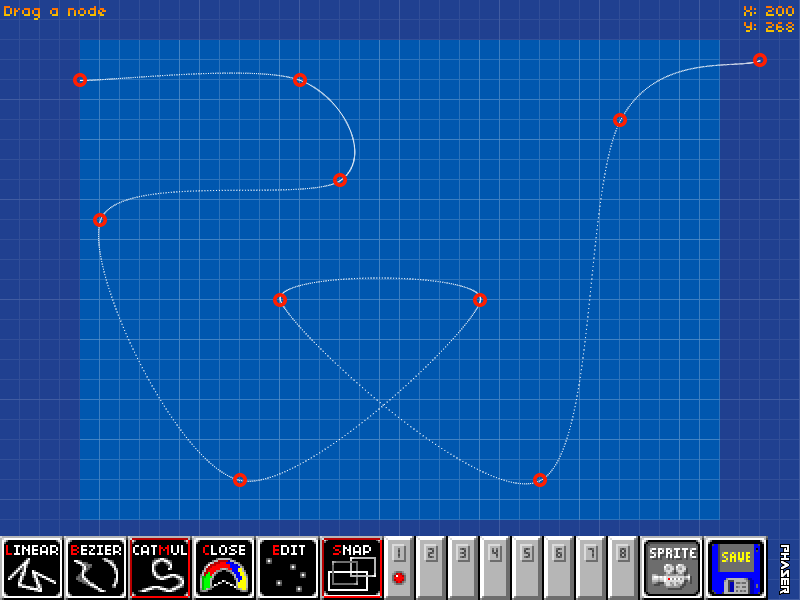
I spent quite a while putting this editor together and it has some nice features:
- Easily Add and Remove points on the path
- Toggle grid snapping
- Keyboard short-cuts for all functions
- Swap between and edit 8 different paths at once
- Export as JSON data
- Send a sprite down a path to test it
- Manipulate the paths in real-time, even as sprites follow them
- Set a path as being a ‘closed loop’ or open
Use WaveForms for free at phaser.io/waveforms/
You can also buy the complete source code to WaveForms for $10 USD. With the source you can run WaveForms locally and of course disable the splash screen. You’re then free to add whatever additional features you’d like: tweak the export code, merge it into your own tools, adjust the grid or game size or whatever you require.
If you feel WaveForms would be useful then please support my on-going work with Phaser and buy the source code.

Here is what’s new in the Phaser world this week:
- Intel XDK Free tools to build Phaser games fast and deploy to app stores!
- Pepper Tech Robot Seen here playing Phaser games!
- Desenvolvimento de Games com Opal + Phaser Speaker Deck
- Amphibian Wars III Hits App Store. Congratulations guys 🙂
- The basics of responsive HTML Games Scaling for resolutions
- Phaser Tiled Extras A plugin that adds in new features from Tiled
- The New Age of Browser Based Gaming Free webinar on March 11th
- Flawless Asteroids Ship Control Tutorial and Source package
- 1 + 2 = 3 A game made in 100 lines of Phaser code
- HTML5 Multiplayer Starter Kit for Phaser and Pomelo Sign-up
- Phaser Modal Creator Create modal windows with ease
- generator-phaser-alternative An alternative Phaser generator for Yeoman
Got something you’d like featured? Get in touch.

If you’ve questions or comments about the code then please ask. Equally if there are things you’d like me to write about then tell me! Until next week, happy coding.
Discuss: HTML5 Game Devs Forum
Tweet @photonstorm (hashtag #phaserjs)
Posted on March 3rd 2015 at 11:26 pm by Rich.
View more posts in Phaser. Follow responses via the RSS 2.0 feed.
Make yourself heard
Hire Us
All about Photon Storm and our
HTML5 game development services

Recent Posts

OurGames
Filter our Content
- ActionScript3
- Art
- Cool Links
- Demoscene
- Flash Game Dev Tips
- Game Development
- Gaming
- Geek Shopping
- HTML5
- In the Media
- Phaser
- Phaser 3
- Projects
Brain Food