Phaser Coding Tips 5
Phaser Coding Tips is a free weekly email – subscribe here.
After a couple of weeks spent working on platform game mechanics I felt we ought to take a small break. Therefore this weeks tutorial is based on an often requested feature on the forum: grid movement. Or more specifically, “How to move around a grid smoothly like Pacman”.
We’ll cover the code needed to gracefully slide around a tilemap, turning on a dime and create the full core of a Pacman game.
Get the source
I’m only going to highlight the most important parts of the code here. So please always look at the source first. If you’ve questions about something I didn’t cover then ask on the forum.
Run / Edit the Cars code on jsbin or codepen
Run / Edit the Pacman code on jsbin or codepen
Clone the phaser-coding-tips git repo.

The Basic Set-up
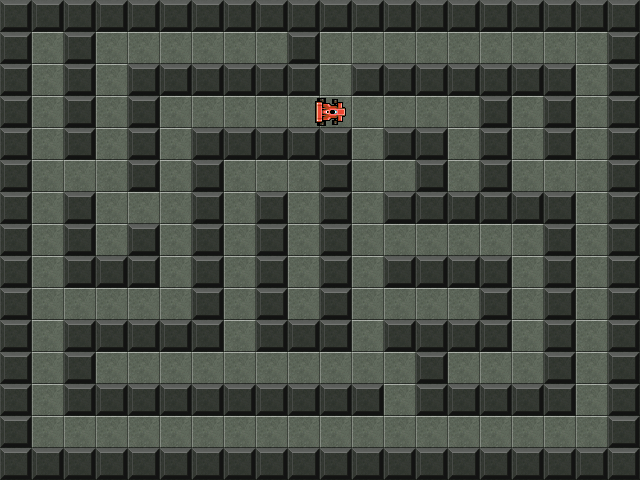
We’ll need a player sprite and a tilemap. The tilemap contains the layout of the level. Here we’ve drawn a simple level in Tiled:
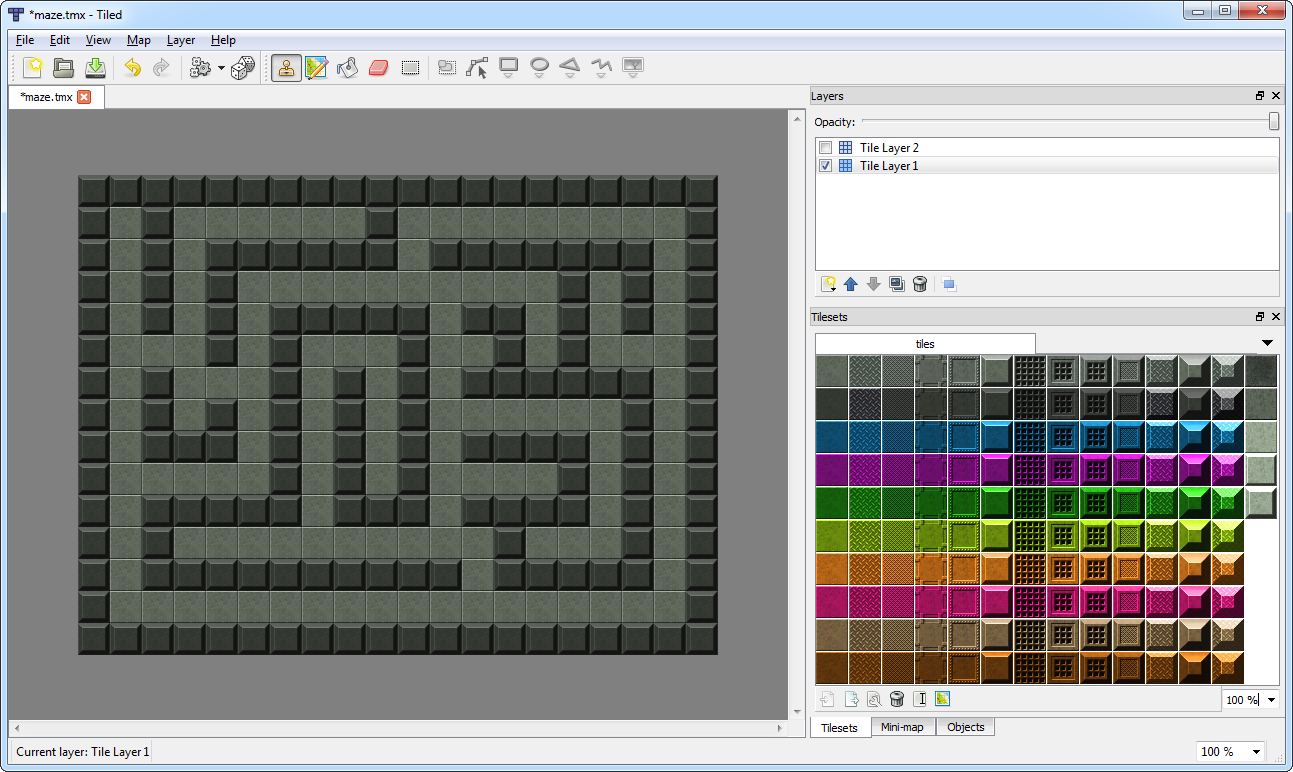
This is exported as a JSON file and loaded into our game, along with the tileset. In the create method we set our objects up:
this.map = this.add.tilemap('map');
this.map.addTilesetImage('tiles', 'tiles');

this.layer = this.map.createLayer('Tile Layer 1');

this.map.setCollision(20, true, this.layer);

this.car = this.add.sprite(48, 48, 'car');
this.car.anchor.set(0.5);

this.physics.arcade.enable(this.car);

this.cursors = this.input.keyboard.createCursorKeys();

this.move(Phaser.DOWN);
We create a map and a layer. Collision is set to be tile ID 20 (the dark grey brick tile). The car is positioned in the top-left of the map and is started off moving down the grid.
In the update function we check for collision against the tilemap:
this.physics.arcade.collide(this.car, this.layer);
The Problem Ahead
It’s the movement around the map that makes this an interesting challenge to solve. While on the surface it may appear very simple it actually requires the player object to have a basic intelligence of its surroundings.
The player is controlled by the arrow keys. When a key is pressed they start moving in that direction and don’t stop until they either hit a wall, or another key is pressed taking them in a new direction.
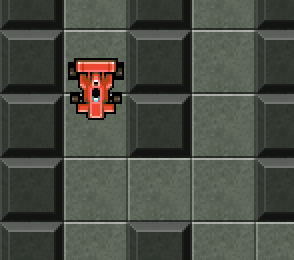
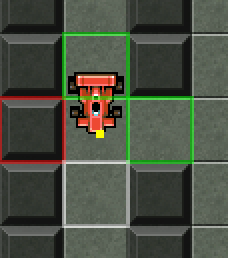
In the above screen shot the car is approaching a junction. If the player doesn’t press anything then it will carry on moving down. However if they press right the car should move right, but only when it exactly hits the space in the wall to the right of it.
You’re Surrounded
So how can the car know if it can turn, and when it should turn? For this we’ll keep track of the 4 immediate tiles surrounding the car.
In the update method we will use a feature built into the Phaser Tilemap class that allows you to scan for a specific tile:
this.marker.x = this.math.snapToFloor(Math.floor(this.car.x), 32) / 32;
this.marker.y = this.math.snapToFloor(Math.floor(this.car.y), 32) / 32;

var i = this.layer.index;
var x = this.marker.x;
var y = this.marker.y;

this.directions[Phaser.LEFT] = this.map.getTileLeft(i, x, y);
this.directions[Phaser.RIGHT] = this.map.getTileRight(i, x, y);
this.directions[Phaser.UP] = this.map.getTileAbove(i, x, y);
this.directions[Phaser.DOWN] = this.map.getTileBelow(i, x, y);
Tilemap.getTileLeft and its fellow methods do exactly what they say on the tin: They’ll return the tile immediately to the left of the given coordinates (or null if no tile was found).
Because they work in tile coordinates and not pixels we first need to find out exactly where our car is in the map. We can do this by calling Math.floor on its x and y values and then using Phaser.Math.snapToFloor to convert those to grid coordinates. This will give us the exact tile is the car is in. We store this in the marker variable.
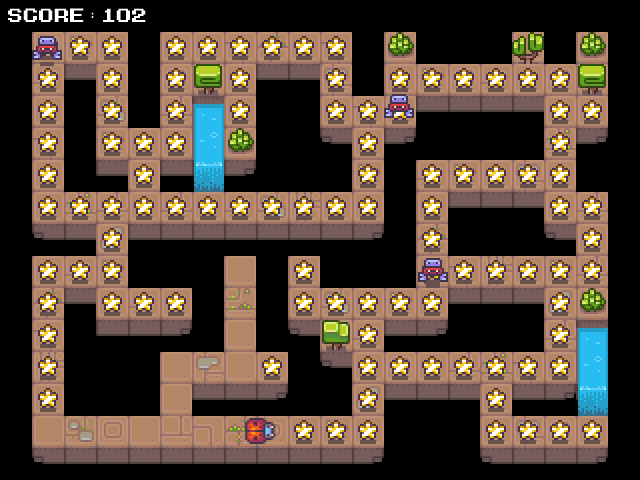
The 4 surrounding tiles are stored in the directions array. With the debug render turned on we can see what the car knows about its surroundings:
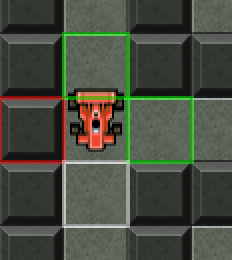
The green tiles are ones the car can safely move in to. Red means ‘blocked’ and the white tile is the current heading.
Dropping a Turn Marker
Knowing if the car is going to be able to turn is the first part of the solution. The second is telling it when to turn, because we only want it to do so when it reaches the correct point in the map – otherwise it will collide with the wall and stop dead.
This is done using the checkDirection method.
It requires one parameter – the direction in which the car wants to turn. This is one of the Phaser direction constants such as Phaser.LEFT or Phaser.DOWN.
The first thing it does is bail-out should any of the following conditions be met:
* The car is already set to turn in that direction
* There isn’t a tile in that direction
* The tile in that direction isn’t a ‘safe tile’ (i.e. is a wall)
If it passes those conditions then a turn marker is set. This is stored in turnPoint, a Phaser.Point object that holds the coordinate of point at which we want the car to change direction.
if (this.current === this.opposites[turnTo])
{
this.move(turnTo);
}
else
{
this.turning = turnTo;

this.turnPoint.x = (this.marker.x * this.gridsize) + (this.gridsize / 2);
this.turnPoint.y = (this.marker.y * this.gridsize) + (this.gridsize / 2);
}
The ideal turning point is the middle of the tile the car is currently entering. This can be seen by the yellow dot:
Warm and Fuzzy Inside
When the car.x and car.y values match the turning point values, the car is turned to face its new direction. This is fine if we know the car is moving at exactly 1 pixel per frame, but falls over if we want to apply acceleration, velocity or any kind of delta smoothing to the speed of the car – because its x/y coordinates will almost certainly never exactly equal the turn point.
To get around this we use Phaser.Math.fuzzyEqual. This works by taking two values and a threshold. It compares the values and if they are within the threshold difference of each other, they are considered as being equal:
this.math.fuzzyEqual(a, b, threshold)
This is perfect for our needs. Based on a velocity of 150 we can use a threshold value of 3. This is enough to ensure that the car won’t skip past the turning point. In the update method we check to see if the car has reached the turning point.
When it has we reset its coordinates, do the same to its physics body and then send it off in its new direction:
this.car.x = this.turnPoint.x;
this.car.y = this.turnPoint.y;

this.car.body.reset(this.turnPoint.x, this.turnPoint.y);

this.move(this.turning);

this.turning = Phaser.NONE;
With this final part in place you can now freely drive around the map, turning into the corners and sliding into the walls at will.
Enter Pacman
Let’s turn our working mechanic into a Pacman clone. It is set-up on exactly the same basis – a player sprite and a tilemap. The difference is that our Pacman sprite is animated:
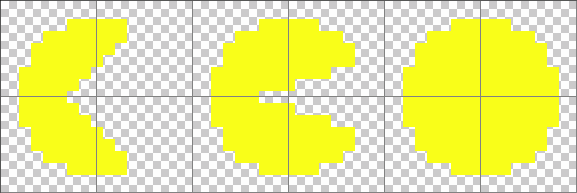
The animation is handled with the Phaser Animation Manager:
this.pacman.animations.add('munch', [0, 1, 2, 1], 20, true);
this.pacman.play('munch');
However in our move method we need to turn him to face his new direction:
this.pacman.scale.x = 1;
this.pacman.angle = 0;

if (direction === Phaser.LEFT)
{
this.pacman.scale.x = -1;
}
else if (direction === Phaser.UP)
{
this.pacman.angle = 270;
}
else if (direction === Phaser.DOWN)
{
this.pacman.angle = 90;
}
We reset his horizontal scale and angle, and then adjust them based on his direction. By default he faces the right, so we can flip his scale.x to make him face left. In order to face up or down we rotate him.
The other import part is that Pacman is actually much larger than the grid – so we need to adjust his physics body to fit:
this.pacman.body.setSize(16, 16, 0, 0);
This gives him a 16×16 sized body in the middle of the sprite (which is 32×32). This fits into our 16×16 sized grid perfectly.
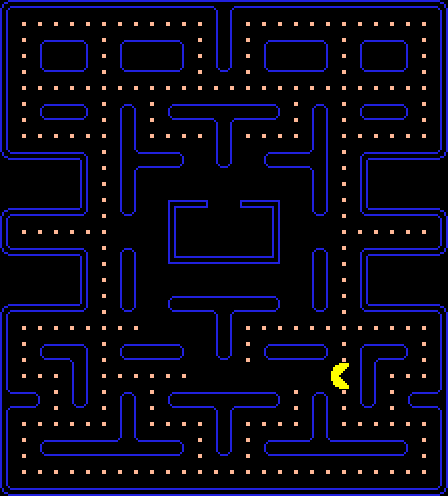
Going Dotty
Pacman needs some dots to munch on. These have been drawn into the tilemap using tile ID 7. So we’ll use a Phaser feature to convert all tiles with an ID of 7 into Sprites.
this.dots = this.add.physicsGroup();

this.map.createFromTiles(7, this.safetile, 'dot', this.layer, this.dots);

this.dots.setAll('x', 6, false, false, 1);
this.dots.setAll('y', 6, false, false, 1);
This takes the dot tiles, replaces them with blank floor tiles (the safetile) and adds a Sprite into the dots Group for every one of them. The setAll calls adjust the position of the dot sprites, adding 6px to their values because they are only 4×4 in size – this puts them back into the middle of the tiles.
Collision between Pacman and the dots is handled in update:
this.physics.arcade.overlap(this.pacman, this.dots, this.eatDot, null, this);
If they overlap we call:
eatDot: function (pacman, dot) {

dot.kill();

if (this.dots.total === 0)
{
this.dots.callAll('revive');
}

},
The dot is killed. If the dots Group gets down to a total of zero alive dots then we revive them all – so you can eat them all over again!
Hopefully you can see that with very little extra code we’ve now got the essentials for a smooth Pacman game.
Star Bug
Based on the code here we took the concept and evolved it further. Adding more levels, flying baddies and an assortment of collectibles. The end result is the game Star Bug:
This game will be featured in our forthcoming Phaser Book of Games.
Brain Food
Here are some ways to enhance this code:
Key Timers – you have to be holding the key down the moment you hit a corner or junction in order to turn. The second you let go of a key the player ignores the turn. You could have a ‘cooling down’ period after a key is let go – so the player will still turn, even if the key isn’t actually held down, so long as it was pressed within the last X* milliseconds. The value is up to you to determine!
* Ghosts. ’nuff said 🙂
* Wall segments you can go through, teleports and screen-edge wrap-arounds.

Here is what’s new in the Phaser world this week:
* Play with light and dark Using ray casting and visibility polygons
* Using a Webcam with Phaser Demo and code
* Curvatron Single-button Tron for up to 8 players!
* Phaser Chains A great new way to search the Phaser Documentation
* Sneaky Escape Promoting the new Shaun the Sheep Movie
* Creando Juegos HTML5 con Phaser en Monaco, el Editor de Código de Visual Studio Online In Spanish
Got something you’d like featured? Get in touch.

If you’ve questions or comments about the code then please ask. Equally if there are things you’d like me to write about then tell me! Until next week, happy coding.
Discuss: HTML5 Game Devs Forum
Tweet @photonstorm (hashtag #phaserjs)
Posted on February 6th 2015 at 5:30 pm by Rich.
View more posts in Phaser. Follow responses via the RSS 2.0 feed.
Make yourself heard
Hire Us
All about Photon Storm and our
HTML5 game development services

Recent Posts

OurGames
Filter our Content
- ActionScript3
- Art
- Cool Links
- Demoscene
- Flash Game Dev Tips
- Game Development
- Gaming
- Geek Shopping
- HTML5
- In the Media
- Phaser
- Phaser 3
- Projects
Brain Food