Phaser Coding Tips 1
Phaser Coding Tips is a free weekly email – subscribe here.
Welcome!
If you’re anything like me you probably write loads of code. From prototypes demonstrating a single mechanic to helper functions. And sometimes you might even finish a game 🙂
I started this series as a means to share code with you in an informal manner, one game dev to another. The aim is to build-up something over the course of a couple of weeks. Each chunk being easily digestible in a short period of time. It’s something I call “lunch break game dev”: in that you can read and experiment for yourself in under an hour (just try not to get crumbs in your keyboard.)
I’m not writing to any fixed agenda here. I fully expect this series to evolve. If something doesn’t work I’ll pull it, and I equally won’t be scared of trying new things. Maybe one week the code will be far too easy for you, another it might be the opposite. But hopefully in all cases it will spark some ideas for you to play with regardless.
Finally I’m not here to try and “sell” you anything. If I release a new book or plugin then I’ll probably write about it, but only because I’ll be so pleased at having achieved that! On the whole this is our place to write some code together, so please do leave feedback and ideas.

Tanks – Part 1
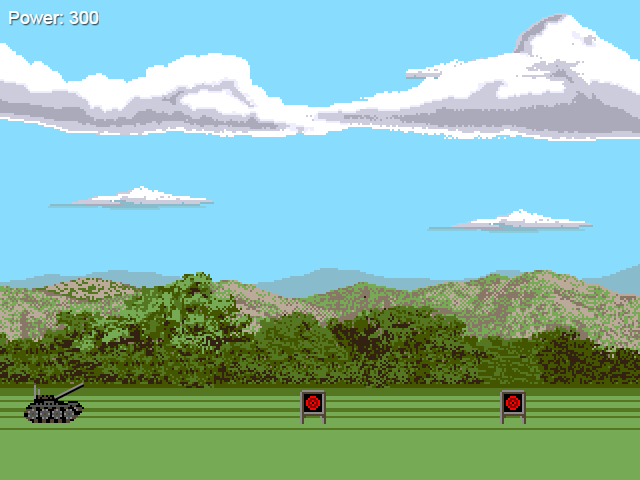
Let’s make a Tanx style game. It uses the same mechanic as games like QBASIC Gorillas and Scorched Earth.
You control a tank. You can adjust the elevation of the turret, set the power and then fire. The bullet flies across the landscape hopefully hitting the targets.
This week we’ll display the tank, allow it to aim, fire and track the bullet with the camera. Next week we’ll add the landscape and allow you to blow holes in it!
Get the source
Run and live-edit the code on jsbin or codepen. You can also clone the git repo.
Graphics from Amiga Tanx Copyright 1991 Gary Roberts
init
Because this game uses pixel art we’re going to use a rounded canvas renderer:
this.game.renderer.renderSession.roundPixels = true;
This will stop Phaser from rendering graphics at sub-pixel locations, keeping them nice and crisp. We’ll also set the game world to be 992 pixels wide, enable physics and setting a gravity value of 200:
this.game.world.setBounds(0, 0, 992, 480);

this.physics.startSystem(Phaser.Physics.ARCADE);
this.physics.arcade.gravity.y = 200;
create
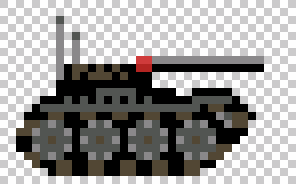
We need to assemble the tank. It’s split into two images: the base of the tank, and the turret. The turret is positioned against the base so it looks correct when rotating. The area highlighted in red is where they are “joined”:
We also create a Group of targets to shoot. This is a standard Phaser Group with Arcade Physics enabled on it. However because of this we need to stop gravity from pulling the targets away:
this.targets.setAll('body.allowGravity', false);
setAll lets you quickly set the same property across all members of the Group. In this case we tell it to disable gravity.
The rest of the create block is simply putting together sprites, text and come basic keyboard controls.
Set the turret angle
In the update method we allow the player to set the angle of the turret. This is done with a check to ensure it is kept within limits and then we change the Sprite.angle property of the turret. The default anchor of the turret means this rotation works correctly with no further settings.
if (this.cursors.up.isDown && this.turret.angle > -90)
{
this.turret.angle--;
}
else if (this.cursors.down.isDown && this.turret.angle < 0)
{
this.turret.angle++;
}
fire
When the player presses the space bar we’ll fire a shot. This is handled in the fire method. It starts by setting the bullet back to the turret coordinates (in case it has already been fired):
this.bullet.reset(this.turret.x, this.turret.y);
We also want to display the ‘flame’ sprite when they shoot. This is a burst of fire that emits from the end of the turrets gun then fades away:
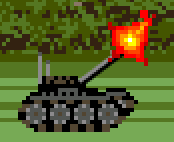
We know the coordinates of the left of the turret, but what about the end? There are several ways to solve this but I chose to use Point.rotate.
var p = new Phaser.Point(this.turret.x, this.turret.y);

p.rotate(p.x, p.y, this.turret.rotation, false, 34);

this.flame.x = p.x;
this.flame.y = p.y;
This allows you to calculate where the Point would be if it was rotated and moved from its origin. In the code above we set the rotation to match the turret, and the distance 34 pixels works for these assets. The end result is that the flame effect appears at the end of the gun, regardless of its angle of rotation.
The final part of firing is to launch the bullet.
this.camera.follow(this.bullet);

this.physics.arcade.velocityFromRotation(this.turret.rotation, this.power, this.bullet.body.velocity);
The launch trajectory is based on the angle of the turret and the power the player has set. It will calculate the velocity need for these two factors and inject them into the velocity of the bullet.
At the same time we tell the Camera to track the bullet as it flies.
boom?
In the update method we check if the bullet exists (i.e. is in flight), and if so we perform an overlap check between it and the targets. If they overlap the target is killed and the bullet removed:
removeBullet: function () {

this.bullet.kill();
this.camera.follow();
this.add.tween(this.camera).to( { x: 0 }, 1000, "Quint", true, 1000);

}
We need to stop the Camera tracking the bullet so that the tween works. The tween pauses for 1 second then tweens the Camera back to look at the tank again ready for the next shot. If you don’t stop the Camera following the tween will seem to fail, because Camera tracking takes priority over positioning of it.
That’s it for Part 1. Obviously there’s more code in the source, but all the important bits are covered above.
In Part 2
In Part 2 we’ll add a complete landscape. The targets will be positioned all over it. And then we’ll add the code needed to let you blow holes out of it all and have the terrain deform in real-time.

Here is what’s new in the Phaser world this week:
- Phaser 2.2.2 is Released Loads of updates and fixes!
- Coding With Kids – Making Games with Phaser At Microsoft Malvern, PA.
- The State of HTML5 Gaming & Developing Your First Game with Phaser At NYC.JS
- Let’s Make a Game With Phaser Video By Gabe Hollombe from JSConf.Asia
- Sokoban Game Tutorial Part 2 Keyboard controls and unlimited undos
Got something you’d like featured? Get in touch.

If you’ve questions or comments about the code then please ask. Equally if there are things you’d like me to write about once Part 2 is published then please say.
HTML5 Game Devs Forum – Coding Tips Issue 1 thread
Twitter – @photonstorm.
Posted on January 10th 2015 at 1:08 am by Rich.
View more posts in Phaser. Follow responses via the RSS 2.0 feed.
Make yourself heard
Hire Us
All about Photon Storm and our
HTML5 game development services

Recent Posts

OurGames
Filter our Content
- ActionScript3
- Art
- Cool Links
- Demoscene
- Flash Game Dev Tips
- Game Development
- Gaming
- Geek Shopping
- HTML5
- In the Media
- Phaser
- Phaser 3
- Projects
Brain Food