Flash to Phaser JSFL Script

What is it?
Flash to Phaser is a JSFL script that will aid in the process of laying out scenes within the Flash IDE and converting them into Phaser JavaScript files. It works by parsing the Stage for any Bitmap or Symbol objects and then automatically builds-up a JavaScript source file including preload and create functions that accurately re-create what is seen inside the Flash IDE.
If the script encounters a Symbol it treats it as a Phaser Group and uses the Symbol name as a Group name. Any Bitmaps within the Symbol are treated as Group children and positioned accordingly.
Objects have their x, y, rotation and scale properties re-created in the JavaScript.
Installation
Download the JSFL file from Github (you’ll also find this guide as a PDF there)
There are two ways to install JSFL scripts into the Flash IDE. One is to copy them into the Flash application data folder, specifically into the “Configuration/Commands” sub-folder. The location of this varies tremendously based on OS and Flash version. There is a slightly out dated guide available here on the Adobe site.
An easier method is to create the script manually, which is what I’ll describe here.
1) Open Flash. In this guide I’m using Flash CC, but the process should be the same regardless.
2) On the “Open” screen select “Create New: Flash JavaScript File”
![sshot-2014-05-28-[1]](http://www.photonstorm.com/wp-content/uploads/2014/05/sshot-2014-05-28-1.png)
3) The Flash IDE will open a completely blank document. Copy and paste the entire contents of the “Flash to Phaser.jsfl” script into this editor window. You can find the latest version of this script in the Phaser github repository in the ‘resources’ folder.
![sshot-2014-05-28-[4]](http://www.photonstorm.com/wp-content/uploads/2014/05/sshot-2014-05-28-4.png)
4) Once pasted in, select “File – Save As” and it will prompt you for a name for the script. Enter “Flash to Phaser.jsfl” and hit “Save”.
5) The script is now installed and ready for use.
How to prepare your FLA
The JSFL script works by parsing all objects that are on the first Layer of the Stage. It only supports Bitmaps and Symbols.
It will automatically round object x/y values to the nearest whole pixel. If you don’t wish for this you can edit the JSFL script and set the var round Boolean to false.
Bitmaps
These are the easiest to manage. Simply drag all the images you require for your game into the Flash Library. Then drag them onto the Stage ensuring they are on the first Layer. Once on the Stage you can position them, rotate them and scale them as required.
The order in which they are layered on the Stage controls the order in which they are created within Phaser. So bitmaps placed “behind” other bitmaps will re-create in that order in the generated JavaScript code.
Symbols
The script converts Symbols into Phaser Groups. A Symbol can contain as many Bitmap objects as you like, all positioned, scaled and rotated as required relative to the parent.
When the script runs it will identify that you’ve got a Symbol on the Stage and generate a Phaser Group based on its name. The Group will be positioned matching the Symbol coordinates.
It will then scan one level deep within the Symbol for any Bitmap objects and create those as children of the Group. There are two important things to remember to ensure an accurate export:
- The Symbol name becomes the Group name, with any spaces removed.
- The Symbol registration point must be the top-left:
![sshot-2014-05-28-[12]](http://www.photonstorm.com/wp-content/uploads/2014/05/sshot-2014-05-28-12.png)
In the screen shot below you can see several bitmaps dragged onto the Stage:
![sshot-2014-05-28-[7]](http://www.photonstorm.com/wp-content/uploads/2014/05/sshot-2014-05-28-7.png)
The rotation of the bunny sprite, the scale of the computer will all be exported. The flying hotdogs are part of a Symbol and will be exported as children of them. Here is the resulting JavaScript code:
function preload() {

    game.load.image('atari130xe', 'atari130xe.png');
    game.load.image('car', 'car.png');
    game.load.image('bunny', 'bunny.png');
    game.load.image('budbrain_chick', 'budbrain_chick.png');
    game.load.image('hotdog', 'hotdog.png');

}

function create() {

    var atari130xe = game.add.sprite(57, 402, 'atari130xe');
    atari130xe.scale.set(1.331787109375, 1.33184814453125);

    var car = game.add.sprite(724, 336, 'car');

    var bunny = game.add.sprite(368, 380, 'bunny');
    bunny.angle = -18.984481811523438;
    bunny.scale.set(0.9999847412109375, 0.9999847412109375);

    var budbrain_chick = game.add.sprite(302, 54, 'budbrain_chick');

    var hotDogs = game.add.group();
    hotDogs.x = 41;
    hotDogs.y = 121;

    var hotdog = hotDogs.create(698, 279, 'hotdog');

    var hotdog1 = hotDogs.create(0, 56, 'hotdog');

    var hotdog2 = hotDogs.create(491, 0, 'hotdog');

}
You can see how the script has worked out which images to preload, assigned them all safe keys and created unique local variables for further editing.
How to run the JSFL Script
Once installed you can select the script from the “Commands” menu within Flash. It will appear on the list as “Flash to Phaser”:
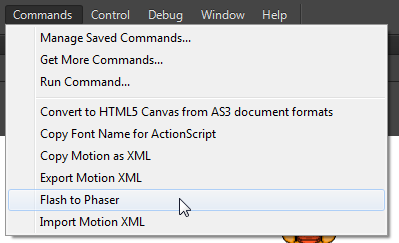
The script will run immediately upon selection, so make sure your FLA is prepared and saved before launching it.
When the script has finished running a “Save As” window will appear:
![sshot-2014-05-28-[10]](http://www.photonstorm.com/wp-content/uploads/2014/05/sshot-2014-05-28-10-640x473.png)
This is asking for the name of the JavaScript file that will be saved. Give it a name and if all has gone to plan a new JS file will be saved into the location specified. You can also see the content of the JavaScript file in the Flash “output” window.
Comments and Enhancements
Hopefully you’ll find this script useful. Feel free to enhance or modify it to best suit your needs. If you add a particularly useful feature please submit a Github Pull Request so we can merge those changes back into the library for everyone else to benefit from.
This script is provided as-is under the MIT License. No technical support is provided. Although if you do get stuck, please ask on the Phaser Forum.
Posted on May 28th 2014 at 3:35 am by Rich.
View more posts in Phaser. Follow responses via the RSS 2.0 feed.
Make yourself heard
Hire Us
All about Photon Storm and our
HTML5 game development services

Recent Posts

OurGames
Filter our Content
- ActionScript3
- Art
- Cool Links
- Demoscene
- Flash Game Dev Tips
- Game Development
- Gaming
- Geek Shopping
- HTML5
- In the Media
- Phaser
- Phaser 3
- Projects
Brain Food