Advanced Phaser and TypeScript Projects
This tutorial is a follow-up to the TypeScript with Phaser beginners guide. I will assume you have worked through that tutorial already and have a working set-up in which you can compile Phaser projects. From this base we will expand on the simple approach taken in the beginners guide and show how to structure a more advanced project that benefits from the power of TypeScript.
Create a new Project
In the first tutorial everything was hanging off a single app.ts file with one bundled class. This time around we’re going to break it up into more individual classes. In Visual Studio create a new empty TypeScript project, then add the phaser TypeScript definition and JS library files to it as outlined in Step 2 in the first tutorial.
Download this asset pack and unzip it into the project folder. We’ll reference these files in our code.
Create a new TypeScript file called Game.ts and add this code to it:
module Castlevania {

    export class Game extends Phaser.Game {

        constructor() {

            super(800, 600, Phaser.AUTO, 'content', null);

            this.state.add('Boot', Boot, false);
            this.state.add('Preloader', Preloader, false);
            this.state.add('MainMenu', MainMenu, false);
            this.state.add('Level1', Level1, false);

            this.state.start('Boot');

        }

    }

}
Here we have created a new Module called Castlevania under which all of our game classes will live. Obviously you’d change this to whatever your game is actually called, unless you’re genuinely working on a Castlevania game, in which case I’m eternally jealous 🙂
The Game class is extending Phaser.Game. As a result we need to call super in the constructor and pass in our game settings. Once done we add 4 States to the game: Boot, Preloader, MainMenu and Level1, and then start the Boot state. You don’t have to add ALL of the States at this point, but there is no harm in doing so.
When adding this code in Visual Studio you may notice that Boot, Preload, MainMenu, and Level1 are underlined in red. This is because they don’t yet exist within the Project.

Let’s Boot
Create a new TypeScript file called Boot.ts and paste this code in:
module Castlevania {

    export class Boot extends Phaser.State {

        preload() {

            this.load.image('preloadBar', 'assets/loader.png');

        }

        create() {

            //  Unless you specifically need to support multitouch I would recommend setting this to 1
            this.input.maxPointers = 1;

            //  Phaser will automatically pause if the browser tab the game is in loses focus. You can disable that here:
            this.stage.disableVisibilityChange = true;

            if (this.game.device.desktop) {
                //  If you have any desktop specific settings, they can go in here
                this.stage.scale.pageAlignHorizontally = true;
            }
            else {
                //  Same goes for mobile settings.
            }

            this.game.state.start('Preloader', true, false);

        }

    }

}
Our Boot class is where we define global settings for the game. It’s also were we preload the graphics that will be used by the actual Preloader, in this case a simple loading bar image.
The create function is called after the image has loaded. In the code above you can see that we’re setting the maximum number of pointers to 1 and disabling the ‘pause’ checks. This isn’t a require of Phaser, it’s just a good example of the sort of things that go into a common Boot script. This is also where you would define how the game handles scaling. For example if this was aimed at mobile and needed to run at iPad resolution (1024×672) then we would usually add the following code into the ‘mobile settings’ part of the class:
//  In this case we're saying "scale the game, no lower than 480x260 and no higher than 1024x768"
this.stage.scaleMode = Phaser.StageScaleMode.SHOW_ALL;
this.stage.scale.minWidth = 480;
this.stage.scale.minHeight = 260;
this.stage.scale.maxWidth = 1024;
this.stage.scale.maxHeight = 768;
this.stage.scale.forceLandscape = true;
this.stage.scale.pageAlignHorizontally = true;
this.stage.scale.setScreenSize(true);
The code above isn’t needed for this tutorial however.
When all of this has finished Phaser swaps to the Preloader state.
Creating our Preloader, extending a Phaser.State
Create a new TypeScript file called Preloader.ts and paste the following code in:
module Castlevania {

    export class Preloader extends Phaser.State {

        preloadBar: Phaser.Sprite;

        preload() {

            //  Set-up our preloader sprite
            this.preloadBar = this.add.sprite(200, 250, 'preloadBar');
            this.load.setPreloadSprite(this.preloadBar);

            //  Load our actual games assets
            this.load.image('titlepage', 'assets/titlepage.jpg');
            this.load.image('logo', 'assets/logo.png');
            this.load.audio('music', 'assets/title.mp3', true);
            this.load.spritesheet('simon', 'assets/simon.png', 58, 96, 5);
            this.load.image('level1', 'assets/level1.png');

        }

        create() {

            var tween = this.add.tween(this.preloadBar).to({ alpha: 0 }, 1000, Phaser.Easing.Linear.None, true);
            tween.onComplete.add(this.startMainMenu, this);

        }

        startMainMenu() {

            this.game.state.start('MainMenu', true, false);

        }

    }

}
This class is extending Phaser.State. This means you’ve got instant access to all the properties of the State object. Phaser uses a set of specially named functions to perform tasks, one of which is preload. Inside here we can queue calls to Phasers asset loader. As you can see in the code above we’re loading a variety of assets: some images, a sprite sheet and an mp3.
We also create a sprite called preloadBar and link it to the asset loader. It will be automatically cropped as the files load in, making the effect of a preloader bar increasing over time as each file completes:

When the load is finished the create function is called, which is when we fade the preload bar away. On completion of that tween we start the main menu. If you run the game locally you probably won’t even see the preload bar fill-up as the assets will load from the local filesystem too fast to be noticed, but once out in the wild this won’t be an issue and it’ll be important to offer a decent looking preloader screen.
Once everything has finished we start the MainMenu.
The Main Menu
For this tutorial our menu is a picture and a game logo with a couple of simple tweens. Obviously you’ll want to enhance this for your own games, but it serves our purpose here. Create a new file called MainMenu.ts and paste this code in:
module Castlevania {

    export class MainMenu extends Phaser.State {

        background: Phaser.Sprite;
        logo: Phaser.Sprite;

        create() {

            this.background = this.add.sprite(0, 0, 'titlepage');
            this.background.alpha = 0;

            this.logo = this.add.sprite(this.world.centerX, -300, 'logo');
            this.logo.anchor.setTo(0.5, 0.5);

            this.add.tween(this.background).to({ alpha: 1}, 2000, Phaser.Easing.Bounce.InOut, true);
            this.add.tween(this.logo).to({ y: 220 }, 2000, Phaser.Easing.Elastic.Out, true, 2000);

            this.input.onDown.addOnce(this.fadeOut, this);

        }

        fadeOut() {

            this.add.tween(this.background).to({ alpha: 0 }, 2000, Phaser.Easing.Linear.None, true);
            var tween = this.add.tween(this.logo).to({ y: 800 }, 2000, Phaser.Easing.Linear.None, true);

            tween.onComplete.add(this.startGame, this);

        }

        startGame() {

            this.game.state.start('Level1', true, false);

        }

    }

}
I won’t explain all of it because it should start becoming quite familiar by now. A couple of Sprites, tweens to make them appear. Then the game waits for an input event before fading out and starting the Level1 class. When you run it the menu will look like this:
Not too bad 🙂
Extending Phaser.Sprite
Create a new TypeScript file called Level1.ts and add this code to it:
module Castlevania {

    export class Level1 extends Phaser.State {

        background: Phaser.Sprite;
        music: Phaser.Sound;
        player: Castlevania.Player;

        create() {

            this.background = this.add.sprite(0, 0, 'level1');

            this.music = this.add.audio('music', 1, false);
            this.music.play();

            this.player = new Player(this.game, 130, 284);

        }

    }

}
We aren’t going to cover creating a fully working game here, but I do want to use this file to highlight extending Phaser Sprites. In the code above you’ll see a local variable called player that is an instance of Castlevania.Player. Create a new TypeScript file called Player.ts and paste this code in:
module Castlevania {

    export class Player extends Phaser.Sprite {

        constructor(game: Phaser.Game, x: number, y: number) {

            super(game, x, y, 'simon', 0);

            this.anchor.setTo(0.5, 0);

            this.animations.add('walk', [0, 1, 2, 3, 4], 10, true);

            game.add.existing(this);

        }

        update() {

            this.body.velocity.x = 0;

            if (this.game.input.keyboard.isDown(Phaser.Keyboard.LEFT)) {

                this.body.velocity.x = -150;
                this.animations.play('walk');

                if (this.scale.x == 1) {
                    this.scale.x = -1;
                }
            }
            else if (this.game.input.keyboard.isDown(Phaser.Keyboard.RIGHT)) {

                this.body.velocity.x = 150;
                this.animations.play('walk');

                if (this.scale.x == -1) {
                    this.scale.x = 1;
                }
            }
            else {
                this.animations.frame = 0;
            }

        }

    }

}
Here our Player object is extending Phaser.Sprite. As a result we have direct access to all Sprite properties from within it, which is why we can set the velocity directly on the body for example. Upon instantiation a few visual properties are set and an animation walk cycle added. Finally the sprite is added to the game world via game.add.existing(this).
Once the sprite is added to the game world its update function will be called every frame. So to take advantage of this we set the players velocity if the left or right arrow keys are held down. As you’d expect this allows you to make the player walk left or right and animate accordingly. The end result looks like this:
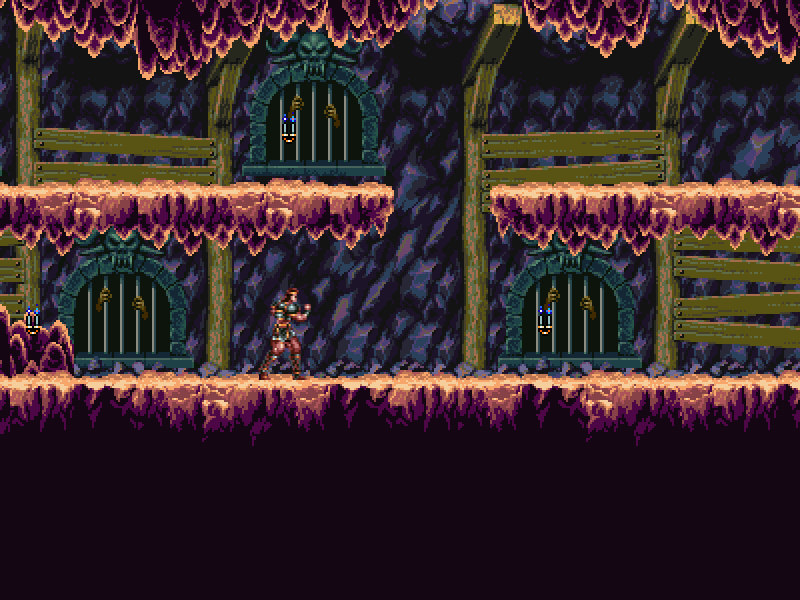
We didn’t have to check for input within the Player class. We could have added an update function to the Level1 class instead and then told the Player to move as a result of that, but it highlighted an important choice: it’s up to you how your code is structured. So long as you adhere to a few basic rules and remember the names of the special Phaser functions, you can achieve pretty much any set-up you require or are familiar with.
Compiling to a single JS file
I’m sure you are keen to try out the project, but first let’s make a couple of small but vital tweaks so we can build it. Enter the Project properties by selecting Properties from the Project menu. Then click the TypeScript Build category on the left and change the settings to match this:
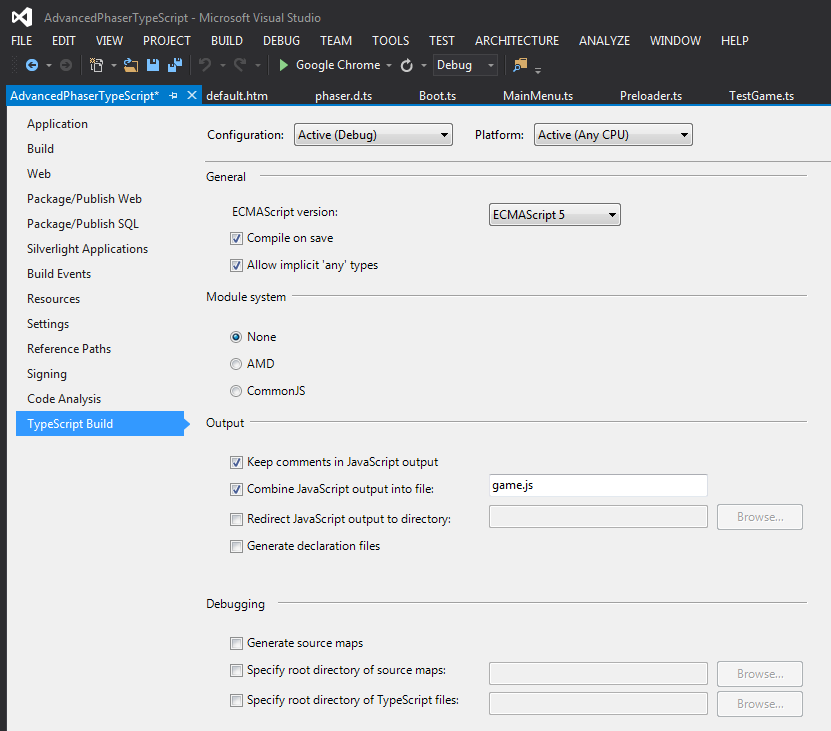
The important things to do are:
- Make sure the ECMAScript version is set to ECMAScript 5.
- Set the Module system to None
- Check ‘Combine JavaScript output into file’ and enter ‘game.js’ as the filename
Save the changes to the Project Properties. What we’ve done is make sure that the whole project will be compiled into a single JavaScript file called game.js. This won’t include Phaser but it will include all of your game code. The last couple of changes we need to make are to the default.htm and app.ts files:
<!DOCTYPE html>

<html lang="en">
<head>
    <meta charset="utf-8" />
    <title>TypeScript HTML App</title>
    <link rel="stylesheet" href="app.css" type="text/css" />
    <script src="phaser.js"></script>
    <script src="game.js"></script>
</head>
<body>

    <h1>TypeScript HTML App</h1>

    <div id="content"></div>

</body>
</html>
Here we’ve included the single output file game.js. And app.ts is reduced to simply this:
window.onload = () => {

    var game = new Castlevania.Game();

};
With all of these files in place you should be able to compile and build the project. And with it you should have a pretty good base from which to build out a complete future game. You can also download all of the Visual Studio project files. We’ve more Phaser tutorials coming, so keep an eye out for them and subscribe to our Phaser newsletter for details.
Castlevania is © Copyright Konami 1988. All rights reserved and is used for illustration purposes only.
Posted on December 11th 2013 at 11:19 pm by Rich.
View more posts in Phaser. Follow responses via the RSS 2.0 feed.
Make yourself heard
Hire Us
All about Photon Storm and our
HTML5 game development services

Recent Posts

OurGames
Filter our Content
- ActionScript3
- Art
- Cool Links
- Demoscene
- Flash Game Dev Tips
- Game Development
- Gaming
- Geek Shopping
- HTML5
- In the Media
- Phaser
- Phaser 3
- Projects
Brain Food