Flash Game Dev Tip #11 – The Flixel Display List Explained

Tip #11 – The Flixel Display List Explained
This question comes up on the flixel forums so often that I feel it warrants a post of all its own. Flixel 2.5 changed the way in which the game is rendered. And it’s important to know the order of the display objects if you ever want to do anything such as insert a 3rd party API like Flint, or display the Flixel mouse cursor on-top of a Mochi leaderboard.
Flixel Display Objects != Display Objects
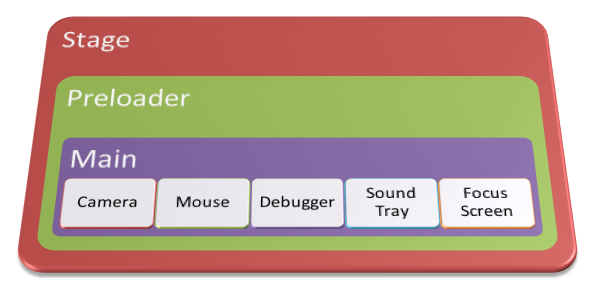
If you are familiar with Flash then you’ll know about Display Objects and how using addChild() allows you to parent them for easy grouping. Flixel uses native Display Objects but only for a few key elements. The following illustration explains the parenting involved:

Stage is the root of your SWF and parent of all Display Objects. It will contain your Preloader which itself usually extends a Sprite or MovieClip. This in turn contains Main which in most cases extends FlxGame, which is a Sprite.
If you are utterly lost at this point because you don’t know how the Flash Display List works then I’d strongly recommend reading Chapter 6 of the AS3 Cookbook. The whole chapter is free to read on-line, so there’s no excuse! Come back once you’ve sussed it.
In terms of Flash Display Objects your FlxGame is usually 2 levels deep. But here is where it starts getting interesting. A default Flixel 2.5 game will create the following 5 Display Objects, all of them Sprites, in this order:
- Camera
- Mouse
- Debugger
- Sound Tray
- Focus Screen
If you set forceDebugger = false then the Debugger will not be there, but generally these are your 5 main objects.
The way Flixel works is that a new Sprite is created for every Camera in your game. If you create 2 new cameras then they appear at the top of the list above, with the Mouse, etc following.
The Camera has its own Buffer, which is a Bitmap and a BitmapData into which the game is rendered. So if you have say 20 FlxSprites all zooming around a nice FlxTileMap world, all of that is rendered down to one single Bitmap stored in the Camera buffer.
Injecting a 3rd party into the mix
So let’s assume you want to use Mochi Leaderboards to display a high score table in your game. You can see from the illustration above that the best place to inject it would be between the Camera and the Mouse, otherwise your mouse pointer will appear behind the leader board. But how do you work out what display index that is? It’s not elegant, but it works:
mouseIndex = FlxG.camera.getContainerSprite().parent.numChildren - 4;Note: If you don’t have the Debugger running (i.e. forceDebugger = false) then use this instead:
mouseIndex = FlxG.camera.getContainerSprite().parent.numChildren - 3;This will return the display index of the mouse pointer Sprite. So you can safely do:
addChildAt(newAPIThing, mouseIndex);.. to inject something that will appear on-top of your game, but below the mouse pointer. If you don’t use a custom Flixel mouse cursor, but use the default operating system one, then you are safe to inject the new Display Object right at the end of this Display List. And it’ll appear over the top of everything else.
Equally if you wanted to use it for say a background effect, like showing a video behind your game (I mean hey, it worked for Sega right?!) then you can just inject the new Display Object at the start of the Display List, before the first camera. Just be warned that if you then create a new camera (or delete an existing one) this order will be lost, as the new camera will budget itself into first place on the Display List.
Injecting a 3rd party into the actual game
![]() As described above your entire game is rendered down to one single Bitmap per camera. Which makes it substantially harder to inject a 3rd party into the game itself. If you wanted to use the lovely Stardust particle engine for example then the one way to approach it is like this:
As described above your entire game is rendered down to one single Bitmap per camera. Which makes it substantially harder to inject a 3rd party into the game itself. If you wanted to use the lovely Stardust particle engine for example then the one way to approach it is like this:
- Create an FlxSprite in your game that will contain the visual result of the 3rd party. Make sure it’s the right size.
- Render the 3rd party to a Bitmap (for example Stardust, Flint and lots of others do this automatically) but don’t add that Bitmap to any display list
- Then do a BitmapData.copyPixel from the 3rd party Bitmap to the FlxSprite.pixels object in your game.
- Voila, the 3rd party will render nicely directly into the FlxSprite. And you can treat it like a normal sprite too – so it can collide, rotate, alpha, etc.
If the 3rd party system doesn’t render to a Bitmap you can still potentially use it, it’s just more complex. For example if it outputs to a Sprite, then in the update loop of your game you’ll need to draw() the Sprite onto the FlxSprite.pixels in your game. This will use the internal Flash vector renderer to render whatever is in the Sprite to a BitmapData. You’ll need to ensure that the draw transform matrix is correct, but typically this is only a case of trial and error. You can also do the same for MovieClips – so this is a viable way to render a MovieClip into your Flixel game. Although I would be wary of doing it in anger, as it eats up CPU time.
Injecting a 3rd party into a game Camera
As the Cameras in Flixel are just Flash Sprites, it is perfectly possible to insert a child Display Object into it. This could go behind the Buffer or in front. The only thing to bear in mind is that if you’ve zoomed the camera it will effect any Display Object children as well. If you need the new object to be behind the buffer then don’t forget to set the Camera’s fill / bgColor values to have a transparent (0x0) alpha channel.
Also don’t forget the other cool things you can do with Sprites. Flash Player 10 will allow you to rotate a Sprite on the Z axis – which means there’s no reason at all why you can’t make either your whole Flixel game (by addressing the Main container Sprite) or a game camera do some really cool 3D slanting / spinning / zooming effects! You can also apply filters to the Camera Sprite and specify BlendModes, which can have some really funky results with a little experimentation.
That’s it for this tip. Sorry there isn’t much code to go with this Tip, but the core information should give you all that you need to start messing with the way Flixel displays things, and allow you to throw new Flash elements into that mix too!
Posted on August 18th 2011 at 1:00 pm by Rich.
View more posts in Flash Game Dev Tips. Follow responses via the RSS 2.0 feed.
Make yourself heard
Hire Us
All about Photon Storm and our
HTML5 game development services
Recent Posts
OurGames
Filter our Content
- ActionScript3
- Art
- Cool Links
- Demoscene
- Flash Game Dev Tips
- Game Development
- Gaming
- Geek Shopping
- HTML5
- In the Media
- Phaser
- Phaser 3
- Projects
Brain Food


